Are you an Open Journal Systems (OJS) user and unsure how to add existing DOIs from a newly transferred journal to your OJS platform? Or have you decided to switch registration methods and set up a new OJS instance? Are you wondering how to move those articles that already have DOIs assigned to them into your OJS instance? Then this is the post for you.
When setting up your OJS instance, many members will take advantage of the DOI plugin and choose the option to have your DOIs automatically assigned and registered with Crossref. This is a great feature, but, unfortunately, won’t work when you’d like to import existing DOIs into your OJS platform. After all, these articles already have DOIs, you definitely shouldn’t duplicate those DOIs!
First, you’ll begin by setting up the Crossref XML Export Plugin as indicated in the instructions. Or, if you already have your instance set up, that is fine too.
In either case, whether you’re a brand-new user or already have your instance established, you’ll go into your Settings and choose Distribution. (Please note, the following screenshots are from OJS version 3.4)
Then, click on the DOIs tab, within Distribution Settings:
Once on this tab, you’ll scroll down to the bottom to the section titled DOI Format. Here, you’ll see options available for how to assign DOIs to your articles. The Default is that OJS will automatically assign a unique eight character suffix. This may be fine for your current articles that you’re registering, but if you have articles transferred to you from another publisher (they’ll have a different prefix and the DOIs will already have been assigned) or if you want to import DOIs that you have already registered using a different method than OJS, you definitely will need to change this.
Instead, you’ll want to choose the option for None - Suffixes must be entered manually on the DOI management page and will not be generated automatically
After making that selection, be sure to click the Save button, as this will ensure you can make the changes/edits you need in the following step.
After clicking Save, you’ll then want to add each article that has already been assigned a DOI. Whether it’s one that was transferred to your organisation or one that you have previously registered through a different method. You’ll go to your Submissions tab and upload your first article as you normally would.
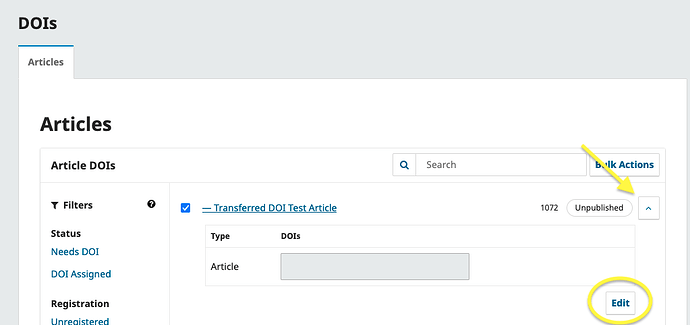
Once you have gone through the submission steps, you can then click on the DOIs section on the left, which will take you to your DOI management screen. There, you will see your newly entered article.
Click on the carrot/drop-down arrow on the right-hand side, then click the Edit button.
Once you click the Edit button, the DOI field for that article will change from grey to white, and you will then be able to add the correct DOI for that article. Click Save and the DOI will be saved for that article.
Once you have added all the articles with existing DOIs, you can go back into your Settings and adjust it back to automatically assigning DOIs, if you would prefer to use that going forward with your new submissions.
Additional Note
As an additional note, if you need to update the resolution URLs attached to any of these DOIs that you’re importing, you’ll want to ensure that you update those URLs with Crossref as well. You can either push those imports to Crossref through OJS, or you can follow our instructions found here for bulk updating resolution URLs. And, as always, if you have questions about this process, do reach out to support@crossref.org for more details.


